.svg)


We know an iPhone can capture some great-looking footage but if you want to create cinematic standard films, all you need is a few helpful tips and a select set of tools, and before you know it, you’ll be directing your very own movie-style videos in no time.
No matter if you’re a traveling videographer, nomad filmmaker, or union cinematographer, the right gear will ensure you make your day with the best results possible. So, with that in mind, here are the most essential accessories for every videographer to include in their kit.

iPhone Video Making Tips
Always try to shoot in landscape mode and keep all your other frames in the same layout.
You wouldn’t want to cut from a landscape frame to a portrait one during your footage, immediately this will look amateurish and the audience will be less impressed. In some instances, you can flip between both modes on the same reel but just bring it back to the original screen layout before cutting.
Never zoom while recording footage.
You may think this is something you see in movies all the time but it really isn’t. The only time it’s ever done is to bring brief attention to an object or emphasize a point. For zoomed-in scenes, a director will usually cut to a closer or close-up shot.
Turn off roving focus on your iPhone video and set manual focus before you begin filming.
If you don’t, your iPhone camera will automatically search for a subject (other than the intended one) and totally throw off your video!
Lock Focus.
For still videos capturing isolated movement/action, for example filming two people at a table eating while standing some distance away, set the focus on them by tapping and holding down a finger on the screen where they are located, so the focus is set on them and no one else around. When you see ‘AE/AF Lock’ appear on the screen then you’ll know the focus is locked on your subject. Also, don’t change your shooting distance (moving towards or away) from your subject after locking the focus – this will diminish image quality.

Full width image screen-to-screen baby.
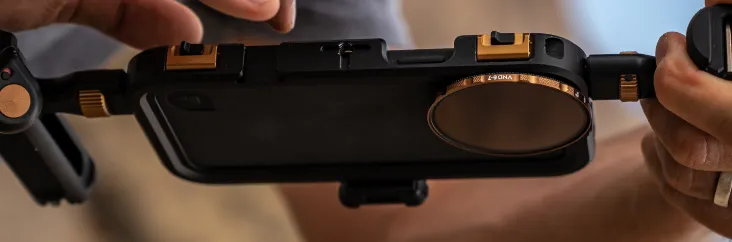
Use An iPhone Filter System
You can attach a filter to your iPhone’s lens the same way that you can add a filter to a camera lens. Filters on your lens can help you to arrive at some pretty amazing footage depending on the ones you choose. A must-have for your iPhone videography is a variable neutral density (VND) filter. These allow you to quickly control the light levels of your scene under various lighting conditions, by reducing the video shutter speed to cinematic levels. Another great filter option is a circular polarizer (CP) that will make colors in your scene appear more vibrant and appealing to look at.
We have a superb filter system that’s designed for both the iPhone 11 and iPhone 12, called the LiteChaser Pro. You have the option to choose from the Filmmaker Kit, Directors Kit, or create a custom kit of your own. Included in these kits are a set of filters (the VND and CP included plus others), a compatible slim-fit iPhone case, and what’s known as a ‘Grip,’ which features a mount to attach tripods, lights, and microphones and help with handling. The LiteChaser phone case facilitates a slide-lock filter mount that allows rapid filter install and removal complete with other specs like wireless charging and a built-in rail system to secure and adjust the Grip during shooting.
Use A Movie Making App
Making cinematic iPhone videos are that much easier now thanks to movie-making apps that you can download on your phone. Film Maker Pro and Filmic Pro are two terrific options that will give you more control over your iPhone videography.
So to take your video-making efforts beyond the standard factory features the iPhone offers, apps will give you more production value allowing you to shoot video and simultaneously sync audio at multiple frames-per-second for a cinematic standard production. These filmmaking apps will also expose you to a plethora of tools, from adding sound effects & thematic music tracks, filters, text overlays & stickers to using green screens and drawing tools, plus much more.
Control Movement With An iPhone Gimbal Stabilizer
Controlling the movement of your camera during filming is a very important aspect of capturing a cinematic iPhone video. When panning across the length of a scene, gliding either backward or towards a subject (remember, not zooming), you may want to do so with a gimbal stabilizer.
These handheld tools are lightweight in design with anti-shake control, allowing you to access some ergonomic motion effects (pan, tilt, angle, rotate) while at the same time offsetting any form of shaking or unwanted movement during shooting.

Omg side by side but like portrait?!

Yes this is real life.
Steady Your iPhone With A Tripod
In some instances, you will want a steady video and for these scenarios, you’ll need a tripod to hold your iPhone in a set position. Our Apex, minimalist tripod + ball head is a robust travel tripod that installs effortlessly to the LiteChaser Pro iPhone case mentioned earlier. Its lightweight and compact design is especially perfect for outdoor enthusiasts needing an on-the-go tripod solution that still offers pro-level stability.
Remote Microphones For Improved Audio
Although the iPhone has a great built-in microphone you’ll need a little more support to get cinematic-type audio on your iPhone video, especially if you’re shooting some distance away from the action or need to capture low-pitched sounds. This can be achieved by connecting a Bluetooth microphone to your device and placing it at the scene of the action. Another alternative is to use a microphone that plugs into your iPhone’s lightning jack or just a stand-alone unit that you can sync the sound to the video in postproduction.

Full width image screen-to-screen baby.
Edit Your iPhone Video
No matter how proud you are of the footage you’ve captured, trimming off irrelevant content is key in creating compelling work. There is absolutely no reason to task your audience into watching something that has no bearing to or is unrelated to the plot of your film. Nor should you linger on footage longer than necessary, there should be an appropriate time allotment for each scene, if not your audience will become bored and bothered.
Also, try to eliminate unwanted objects and distractions from your scene before or (if you can) as you’re recording your film so that the subject is always the focus. Think of this type of on-sight edits as staging your scene so your video shoot goes as seamlessly as possible plus this will minimize postproduction edits.
Whether you chose to use a movie-making app or not, you can edit your iPhone video in your phone’s Photo application. Access several features to add tints, adjust the contrast and trim down or cut the length of your reel. To trim, simply select the video you want to edit then tap the Edit icon, there you will see a series of frames appear below it, all you have to do is drag the yellow bars on each end of the frames to the desired spot and save.